找到
19
篇与
12
相关的结果
- 第 2 页
-
 Android Studio最新版汉化教程(2025年10月17日) 下载语言包插件 Android Studio没有官方的中文语言包,使用IntelliJ的代替 点击下载 修改插件信息 解压压缩包 打开文件夹,向下寻找,找到lib文件夹下的jar包 lib文件夾图片 解压jar包 找到META-INFO文件夹并打开 META-INFO文件夾图片 打开plugin.xml文件 修改版本号为你的Android Studio版本号 修改版本号图片 保存文件,并将解压出来的所有文件重新打包为zip 重新打包为zip图片 修改压缩包zip后缀为jar 修改后缀名图片 安装插件 打开Android Studio,选择从磁盘安装语言包插件 安装语言包图片 打开设置,搜索lang,找到Language and Region,修改语言为中文 修改语言图片 重启Android Studio即可 修改完成图片 参考内容 Android Studio 中文汉化教程 android studio导入中文包
-
蓝奏云 python sdk库 蓝奏云 Python 库使用文档 1. 配置与初始化 首先,准备 config.yaml 配置文件,内容示例: lanzou: username: "你的用户名" password: "你的密码"在代码中读取配置并初始化蓝奏云会话: import yaml from Lanzou import LanzouSession # 读取配置文件 with open("config.yaml", "r", encoding="utf-8") as f: config = yaml.safe_load(f) lanzou_conf = config["lanzou"] # 创建蓝奏云基础实例 session = LanzouSession() # 登录获取cookie status, result = session.login(lanzou_conf["username"], lanzou_conf["password"])2. 文件管理 2.1 创建文件管理实例 from Lanzou import LanzouFileManager file_manager = LanzouFileManager(session)2.2 重命名文件 status, result = file_manager.rename_file("文件ID", "新文件名.png") # 返回示例: # True { # "zt": 1, # "info": "重命名成功", # "text": None, # "dat": None # } # False { # "zt": 0, # "info": "会员已过期,无法使用", # "text": None, # "dat": None # }2.3 删除文件 status, result = file_manager.delete_file("文件ID") # 返回示例: # True { # "zt": 1, # "info": "已删除", # "text": None, # "dat": None # }2.4 上传文件 status, result = file_manager.upload_file("本地文件路径", "上传文件名.txt", "目标文件夹ID") # 返回示例: # True { # "zt": 1, # "info": "上传成功", # "text": [ # { # "icon": "txt", # "id": "246766304", # "f_id": "iYYAN31w12je", # "name_all": "上传测试.txt", # "name": "上传测试.txt", # "size": "18.0 B", # "time": "0 秒前", # "downs": "0", # "onof": "0", # "is_newd": "https://wwa.lanzouq.com" # } # ] # }2.5 移动文件 status, result = file_manager.move_file("文件ID", "目标文件夹ID") # 返回示例: # True { # "zt": 1, # "info": "移动成功", # "text": None, # "dat": None # }2.6 设置文件密码 status, result = file_manager.set_file_pwd("文件ID", "密码", "1") # 返回示例: # True { # "zt": 1, # "info": "设置成功", # "text": None, # "dat": None # }3. 文件夹管理 3.1 创建文件夹管理实例 from Lanzou import LanzouFolderManager folder_manager = LanzouFolderManager(session)3.2 创建文件夹 status, result = folder_manager.create_folder("文件夹名称", "父文件夹ID", "文件夹描述") # 返回示例: # True { # "zt": 1, # "info": "创建成功", # "text": "12296591", # "dat": None # }3.3 删除文件夹 status, result = folder_manager.delete_folder("文件夹ID") # 返回示例: # True { # "zt": 1, # "info": "删除成功", # "text": None, # "dat": None # }3.4 获取文件夹信息 status, result = folder_manager.get_folder_info("文件夹ID") # 返回示例: # True { # "zt": 1, # "info": { # "name": "测试2", # "des": "测试文件夹2", # "pwd": "1vo0", # "onof": "1", # "taoc": "", # "is_newd": "https://wwa.lanzouq.com", # "new_url": "https://wwa.lanzouq.com/b0rafeg1e" # }, # "text": None, # "dat": None # }3.5 修改文件夹信息 status, result = folder_manager.set_folder_info("文件夹ID", "新名称", "新描述") # 返回示例: # True { # "zt": 1, # "info": "成功修改", # "text": None, # "dat": None # }3.6 修改文件夹密码 status, result = folder_manager.set_folder_pwd("文件夹ID", "密码", "1") # 返回示例: # True { # "zt": 1, # "info": "修改成功", # "text": None, # "dat": None # }3.7 获取文件夹列表 status, result = folder_manager.get_folder_list("父文件夹ID") # 返回示例: # True { # "zt": 1, # "info": [ # { # "name": "测试", # "folder_des": "[测试文件夹]", # "folderid": 12295088, # "now": 1 # } # ], # "text": [ # { # "onof": "1", # "folderlock": "0", # "is_lock": "0", # "is_copyright": "0", # "name": "修改测试2", # "fol_id": "12295254", # "folder_des": "[修改测试文件夹2...]" # } # ], # "dat": null # }3.8 获取文件列表 status, result = folder_manager.get_file_list("文件夹ID") # 返回示例: # True { # "zt": 1, # "info": 1, # "text": [ # { # "icon": "jpg", # "id": "246767298", # "name_all": "EB9DA95273BC463B238A14588B7E6E8C.jpg", # "name": "EB9DA95273BC463B238A14588B7E6E8C.jpg", # "size": "342.3 K", # "time": "24 分钟前", # "downs": "0", # "onof": "0", # "is_lock": "0", # "filelock": "0", # "is_copyright": 0, # "is_bakdownload": 0, # "bakdownload": "0", # "is_des": 0, # "is_ico": 0 # } # ], # "dat": null # }4. 分享链接管理 4.1 创建分享管理实例 from Lanzou import LanzouShareManager share_manager = LanzouShareManager(session)4.2 获取文件分享链接 status, result = share_manager.get_file_link("文件ID") # 返回示例: # True { # "zt": 1, # "info": { # "pwd": "bofq", # "onof": "1", # "f_id": "it02C31w1u5i", # "taoc": "", # "is_newd": "https://wnwgongzuoshi.lanzouq.com" # }, # "text": None, # "dat": None # }4.3 获取文件夹分享链接 status, result = share_manager.get_folder_link("文件夹ID") # 返回示例: # True { # "zt": 1, # "info": { # "pwd": "bofq", # "onof": "1", # "f_id": "it02C31w1u5i", # "taoc": "", # "is_newd": "https://wnwgongzuoshi.lanzouq.com" # }, # "text": None, # "dat": None # }5. 他人分享链接下载 5.1 创建下载管理实例 from Lanzou import LanzouDownManager lanzouDown = LanzouDownManager()5.2 获取文件夹参数 status = lanzouDown.get_folder_params("分享链接URL")5.3 获取文件及文件夹列表 status, result = lanzouDown.get_file_list(url="分享链接URL", page=1)5.4 获取文件信息(包含下载链接) status, result = lanzouDown.get_file_info("文件分享链接", pwd="密码", final=True) # 返回示例: # True { # "title": "文件名称.apk", # "size": "57.0 M", # "author": "KongHen02", # "desc": "测试描述", # "url": "https://developer-oss.lanrar.com/file/...", # "down": "" # }5.5 通过下载链接获取下载直链 status, result = lanzouDown.get_final_url("下载链接")6. 打印输出 所有接口返回均为 (status, result),可直接打印: import json print(status, json.dumps(result, indent=4))7. 其他说明 各接口返回状态 status 为布尔值,True 表示成功,False 表示失败 返回结果中的 zt 字段:1 表示成功,0 表示失败 info 字段包含操作结果的详细信息 text 字段通常包含文件或文件夹的详细信息 分享链接管理需要用户登录后才能使用 他人分享链接下载不需要登录即可使用 如需更详细的参数说明或扩展用法,请参考源码或补充提问。 代码下载 cloud_driver_sdk 参考文献 openList
-
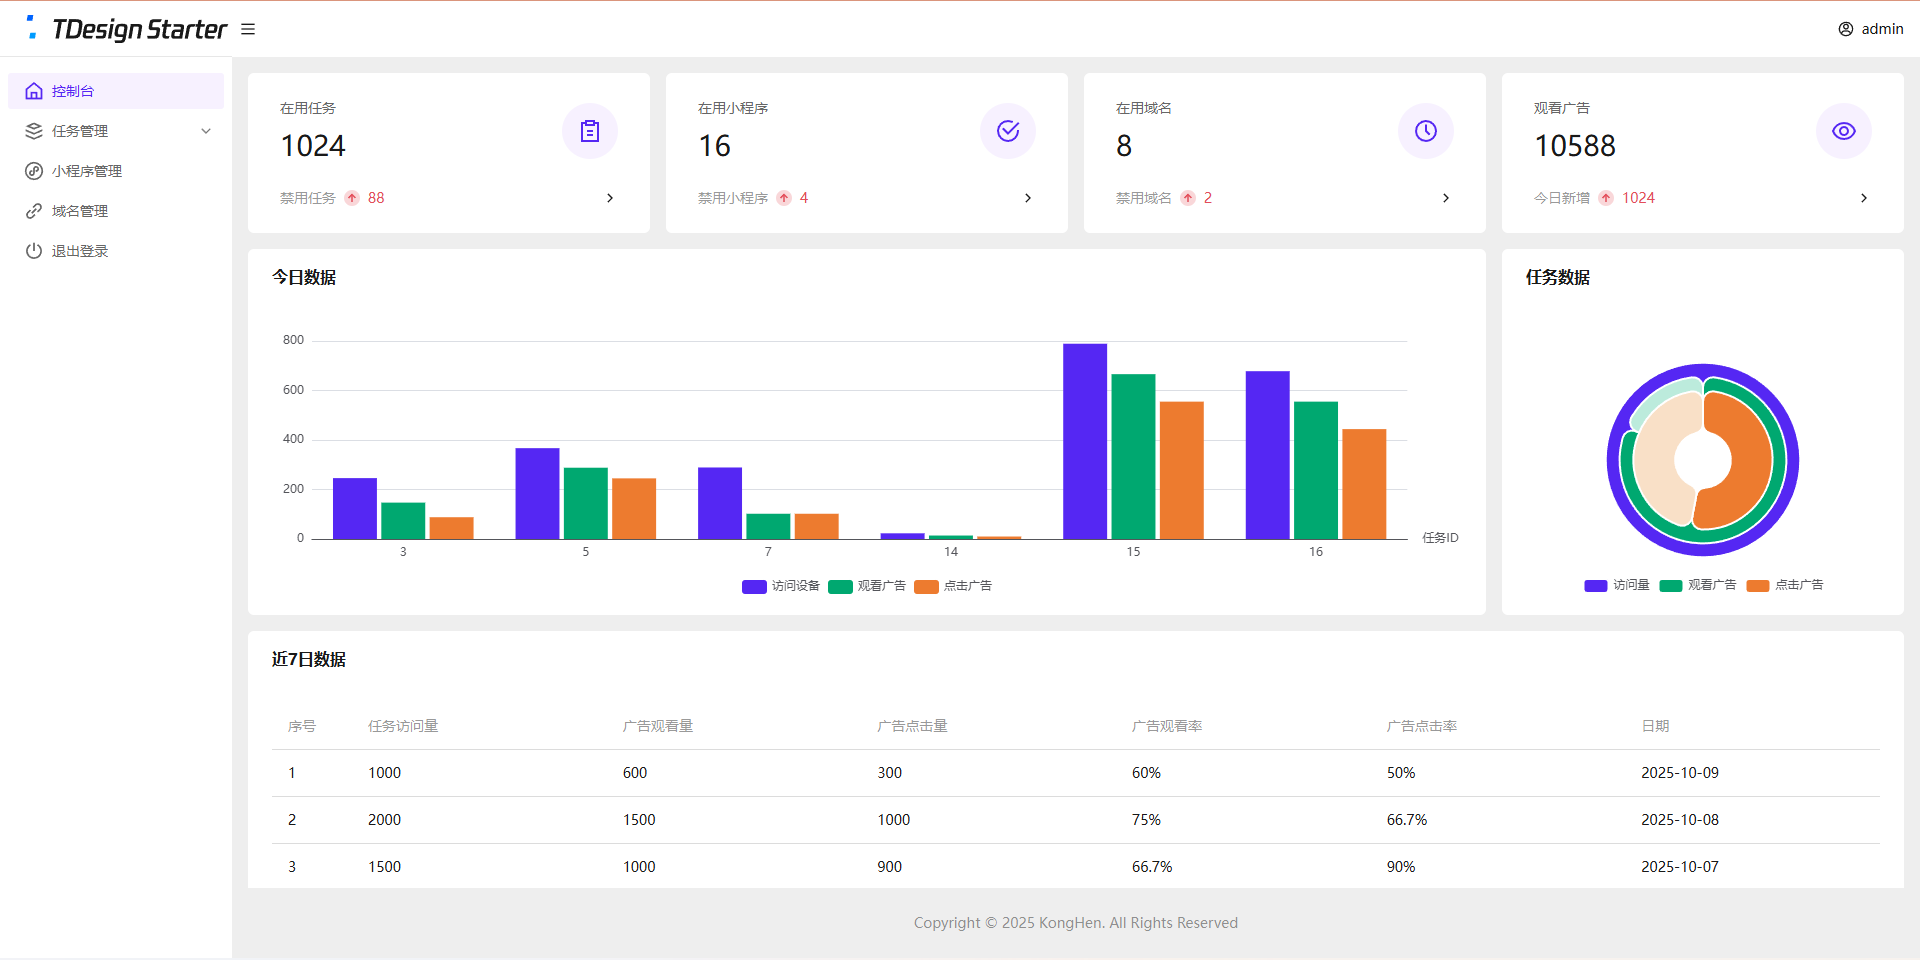
全新任务管理平台(流量主变现系统)开源 项目简介 项目结构 接口管理:PHP + Mysql 后台管理系统:Vue3 + ts + TDesign 任务单页:Vue3 小程序:uniapp + Vue2 变现说明 基础流程: 后台创建任务 复制任务链接 分享到社群或私域 用户打开任务页面 跳转到小程序观看广告 观看广告 下发奖励 收入说明 微信小程序官方广告收入 其他推广/广告收入 支持的奖励类型 链接奖励(适用于下载链接、付费文章等) 文本奖励(适用于通用卡密、密钥等) 卡密奖励(适用于一次性卡密) 系统演示 演示站点 空痕任务管理系统 后台数据为静态演示数据,无法更改 演示图片 管理后台 控制台图片 任务单页 任务单页图片 小程序 小程序图片 安装教程 管理后台 安装依赖 npm install 构建项目 npm run build 新建站网站及数据库 推荐:PHP 8.0 推荐:Mysql 5.7 开启SSL(必须) 配置伪静态 location / { try_files $uri $uri/ /index.html; } location /api/ { if (!-e $request_filename) { rewrite ^/(.*)$ /$1.php last; } } 配置跨域 配置跨域教程 请参考第1种解决方法 导入数据库 导入/后台/数据库/task_dev_xma_run.sql到Mysql数据库 修改/后台/api/config.php 管理账户密码 JWT配置(密钥、过期时间) 数据库配置 上传后台代码 上传/后台/dist目录中的全部文件到网站根目录 上传/后台/api目录到网站根目录 任务单页 安装依赖 npm install 修改/任务单页/src/App.vue中的接口信息 修改后台地址 修改视频教程地址 构建项目 npm run build 新建网站 静态网站 开启SSL(必须) 上传任务单页代码 上传/任务单页/dist目录中的全部文件到网站根目录 小程序 使用HbuildX打开小程序 在manifest.json中获取新AppID 修改/pages/user/view中的后台地址 修改/pages/user/work中的二维码 发行到微信小程序 在微信开发者工具中上传代码 登录微信小程序后台配置 配置request合法域名 https://task.dev.xma.run(更改为自己的后台地址) https://www.duitang.com 配置downloadFile合法域名 https://c-ssl.duitang.com 配置明文scheme拉起此小程序 pages/user/view;pages/user/work 代搭建/教学 请联系微信:KongHen02 项目地址 GitHub
-
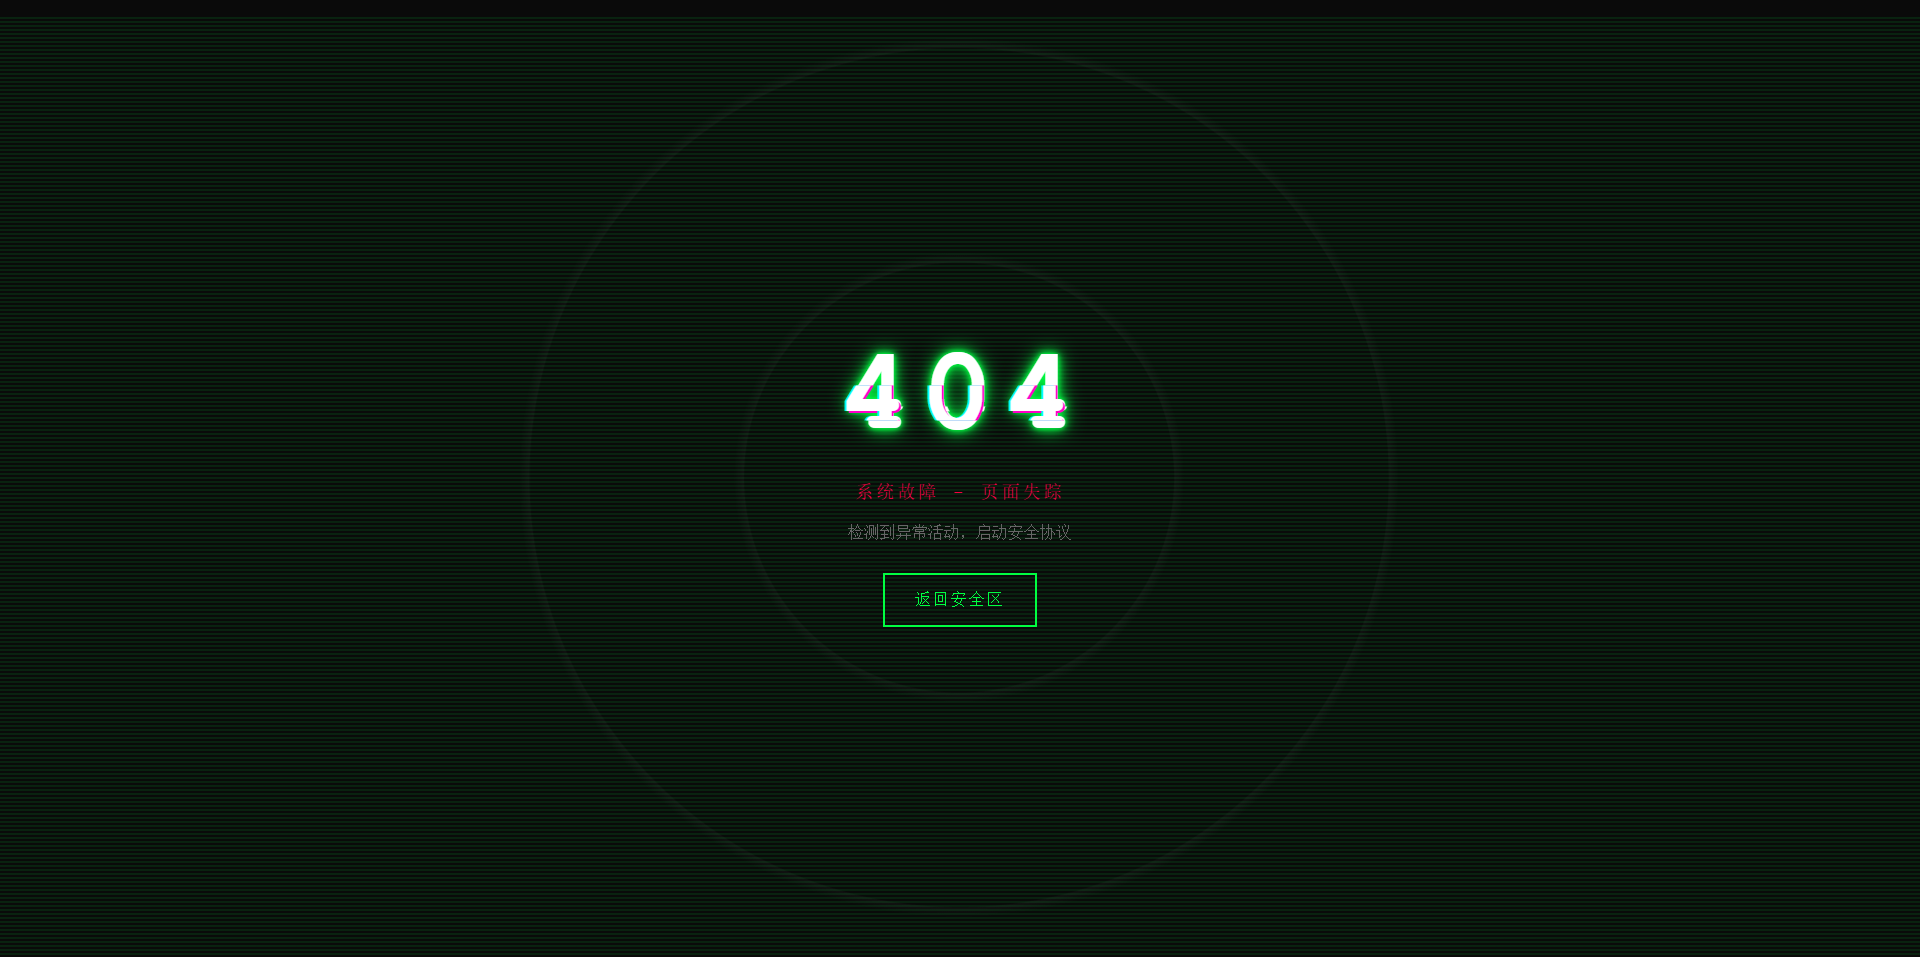
故障风格404页面 效果演示 点击查看在线演示 图片演示图片 完整代码 <!DOCTYPE html> <html lang="zh-CN"> <head> <meta charset="UTF-8"> <meta name="viewport" content="width=device-width, initial-scale=1.0"> <title>系统故障 - 404</title> <style> * { margin: 0; padding: 0; box-sizing: border-box; } body { background: #0a0a0a; font-family: 'Courier New', monospace; height: 100vh; overflow: hidden; display: flex; align-items: center; justify-content: center; color: #00ff41; cursor: crosshair; } .matrix-bg { position: absolute; width: 100%; height: 100%; opacity: 0.1; background: repeating-linear-gradient( 0deg, transparent, transparent 2px, #00ff41 2px, #00ff41 4px ); animation: scan 8s linear infinite; } @keyframes scan { 0% { transform: translateY(-100%); } 100% { transform: translateY(100%); } } .container { text-align: center; position: relative; z-index: 10; } .error-code { font-size: 120px; font-weight: bold; position: relative; display: inline-block; color: #fff; letter-spacing: 10px; animation: flicker 0.5s infinite alternate; } .error-code::before, .error-code::after { content: "404"; position: absolute; top: 0; left: 0; width: 100%; height: 100%; background: transparent; overflow: hidden; } .error-code::before { left: 2px; text-shadow: -2px 0 #ff00c8; animation: glitch-1 0.3s infinite ease-in-out alternate-reverse; clip: rect(44px, 450px, 56px, 0); } .error-code::after { left: -2px; text-shadow: -2px 0 #00ffff, 2px 2px #ff00c8; animation: glitch-2 0.3s infinite ease-in-out alternate-reverse; clip: rect(44px, 450px, 56px, 0); } @keyframes glitch-1 { 0% { clip: rect(31px, 9999px, 94px, 0); } 20% { clip: rect(112px, 9999px, 76px, 0); } 40% { clip: rect(85px, 9999px, 77px, 0); } 60% { clip: rect(62px, 9999px, 34px, 0); } 80% { clip: rect(97px, 9999px, 89px, 0); } 100% { clip: rect(53px, 9999px, 47px, 0); } } @keyframes glitch-2 { 0% { clip: rect(65px, 9999px, 119px, 0); } 20% { clip: rect(52px, 9999px, 74px, 0); } 40% { clip: rect(4px, 9999px, 78px, 0); } 60% { clip: rect(100px, 9999px, 19px, 0); } 80% { clip: rect(22px, 9999px, 98px, 0); } 100% { clip: rect(89px, 9999px, 113px, 0); } } @keyframes flicker { 0%, 19%, 21%, 23%, 25%, 54%, 56%, 100% { text-shadow: 0 0 5px #00ff41, 0 0 10px #00ff41, 0 0 20px #00ff41; } 20%, 22%, 24%, 55% { text-shadow: none; } } .error-message { font-size: 18px; color: #ff0040; margin: 20px 0; animation: pulse 2s infinite; text-transform: uppercase; letter-spacing: 3px; } @keyframes pulse { 0%, 100% { opacity: 1; } 50% { opacity: 0.3; } } .home-button { display: inline-block; padding: 15px 30px; margin-top: 30px; border: 2px solid #00ff41; background: transparent; color: #00ff41; text-decoration: none; text-transform: uppercase; letter-spacing: 2px; position: relative; overflow: hidden; transition: all 0.3s; font-family: 'Courier New', monospace; } .home-button:hover { color: #0a0a0a; box-shadow: 0 0 20px #00ff41; } .home-button::before { content: ''; position: absolute; top: 0; left: -100%; width: 100%; height: 100%; background: #00ff41; transition: left 0.3s; z-index: -1; } .home-button:hover::before { left: 0; } .noise { position: absolute; top: 0; left: 0; width: 100%; height: 100%; background: radial-gradient(circle, transparent 20%, rgba(255,255,255,0.03) 20.1%, transparent 21%), radial-gradient(circle, transparent 40%, rgba(255,255,255,0.03) 40.1%, transparent 41%); animation: noise 0.5s steps(10) infinite; pointer-events: none; } @keyframes noise { 0%, 100% { transform: translate(0); } 10% { transform: translate(-2px, -2px); } 20% { transform: translate(2px, 2px); } 30% { transform: translate(-2px, 2px); } 40% { transform: translate(2px, -2px); } 50% { transform: translate(-2px, -2px); } 60% { transform: translate(2px, 2px); } 70% { transform: translate(-2px, 2px); } 80% { transform: translate(2px, -2px); } 90% { transform: translate(-2px, -2px); } } .system-info { position: absolute; bottom: 20px; left: 20px; font-size: 12px; color: #666; font-family: monospace; animation: typewriter 3s steps(30) 1; } @keyframes typewriter { from { width: 0; } to { width: 100%; } } @media (max-width: 768px) { .error-code { font-size: 80px; } .error-message { font-size: 14px; } } </style> </head> <body> <div class="matrix-bg"></div> <div class="noise"></div> <div class="container"> <h1 class="error-code">404</h1> <p class="error-message">系统故障 - 页面失踪</p> <p style="color: #666; margin-top: 10px;">检测到异常活动,启动安全协议</p> <a href="https://www.khkj6.com" class="home-button">返回安全区</a> </div> <script> // 随机故障效果 setInterval(() => { document.body.style.filter = `hue-rotate(${Math.random() * 360}deg)`; setTimeout(() => { document.body.style.filter = 'none'; }, 100); }, 3000); // 鼠标追踪效果 document.addEventListener('mousemove', (e) => { const x = e.clientX / window.innerWidth; const y = e.clientY / window.innerHeight; const glitch = document.querySelector('.error-code'); glitch.style.transform = `translate(${x * 4}px, ${y * 4}px)`; }); </script> </body> </html>
-
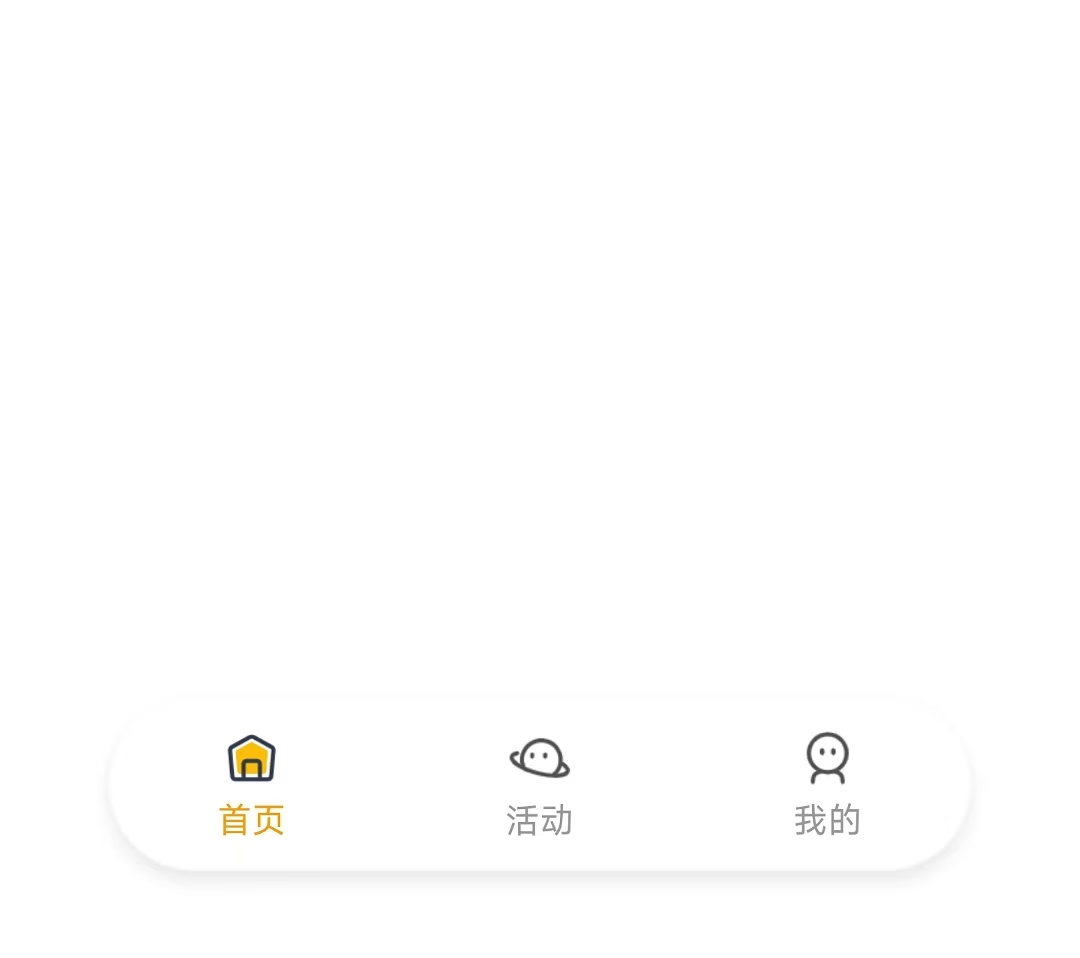
uniapp-x实现自定义tabbar uniapp-x自带导航栏位置固定,且UI无法修改。如果需要适配自己的应用UI及色彩就需要自定义tabbar。 实现说明 将tabbar写入主页面,需要显示的页面作为组件引入。 示例样式 演示示例图片 实现方法 使用swiper实现 说明: 所有页面一次性加载 允许左右滑动 优点:允许滑动切换,用户体验升级 演示代码 <template> <!-- 页面内容区域 --> <swiper style="flex: 1;" :current="selectedIndex" @change="swiperChange"> <swiper-item item-id="index"> <IndexPage></IndexPage> </swiper-item> <swiper-item item-id="more"> <MorePage></MorePage> </swiper-item> <swiper-item item-id="user"> <UserPage></UserPage> </swiper-item> </swiper> <!-- tabber区域 --> <view class="tab-bar-container"> <view v-for="(item, index) in tabList" class="tab-bar-item" @click="switchTab(index)"> <image class="tab-bar-icon" :src="(selectedIndex === index ? item.s_icon : item.icon)"></image> <text class="tab-bar-text" :style="'color:' + (selectedIndex === index ? '#F59E0B' : '#999999') +';'">{{ item.name }}</text> </view> </view> </template> <script setup lang="uts"> // 导入页面 import IndexPage from "./tabbar/index.uvue" import MorePage from "./tabbar/more.uvue" import UserPage from "./tabbar/user.uvue" // tabbar接口类型 type TabInfo = { name : string, icon : string, s_icon : string } // 页面列表 const tabList = reactive<TabInfo[]>([ { name: "首页", icon: "/static/tabbar/home.png", s_icon: "/static/tabbar/home_selected.png" }, { name: "活动", icon: "/static/tabbar/more.png", s_icon: "/static/tabbar/more_selected.png" }, { name: "我的", icon: "/static/tabbar/user.png", s_icon: "/static/tabbar/user_selected.png" } ]) // 选中的页面 const selectedIndex = ref<number>(0) // swiper切换 const swiperChange = (e: UniSwiperChangeEvent) => { let index = e.detail.current if (selectedIndex.value === index) return selectedIndex.value = index } // 页面切换 const switchTab = (index : number) => { if (selectedIndex.value === index) return selectedIndex.value = index } </script> <style lang="scss"> .tab-bar-container { position: fixed; bottom: 60rpx; width: 80%; left: 10%; z-index: 999; display: flex; flex-direction: row; justify-content: space-around; height: 120rpx; border-radius: 60rpx; box-shadow: 0 4rpx 20rpx rgba(0, 0, 0, 0.1); background: rgba(255, 255, 255, 0.4); } .tab-bar-item { display: flex; flex-direction: column; align-items: center; justify-content: center; padding: 15rpx 40rpx; } .tab-bar-icon { width: 44rpx; height: 44rpx; margin-bottom: 8rpx; } .tab-bar-text { font-size: 24rpx; } </style>官方示例 说明: 单次只加载一个页面 加载成功后使用v-show控制显示/隐藏,不重复加载(官方使用CSS属性visibility控制,测试不行) 优点:分页加载,减小单次加载压力(如果页面DOM多的话) 演示代码 <template> <!-- 页面内容区域 --> <view style="flex: 1;"> <IndexPage v-if="tabList[0].init" v-show="selectedIndex==0"></IndexPage> <MorePage v-if="tabList[1].init" v-show="selectedIndex==1"></MorePage> <MorePage v-if="tabList[2].init" v-show="selectedIndex==2"></MorePage> </view> <!-- tabber区域 --> <view class="tab-bar-container"> <view v-for="(item, index) in tabList" class="tab-bar-item" @click="switchTab(index)"> <image class="tab-bar-icon" :src="(selectedIndex === index ? item.s_icon : item.icon)"></image> <text class="tab-bar-text" :style="'color:' + (selectedIndex === index ? '#F59E0B' : '#999999') +';'">{{ item.name }}</text> </view> </view> </template> <script setup lang="uts"> // 导入页面 import IndexPage from "./tabbar/index.uvue" import MorePage from "./tabbar/more.uvue" import UserPage from "./tabbar/user.uvue" // tabbar接口类型 type TabInfo = { init: boolean, name : string, icon : string, s_icon : string } // 页面列表 const tabList = reactive<TabInfo[]>([ { init: true, name: "首页", icon: "/static/tabbar/home.png", s_icon: "/static/tabbar/home_selected.png" }, { init: false, name: "更多", icon: "/static/tabbar/more.png", s_icon: "/static/tabbar/more_selected.png" }, { init: false, name: "我的", icon: "/static/tabbar/user.png", s_icon: "/static/tabbar/user_selected.png" } ]) // 选中的页面 const selectedIndex = ref<number>(0) // 页面切换 const switchTab = (index : number) => { if (selectedIndex.value === index) return if (!tabList[index].init) { tabList[index].init = true } selectedIndex.value = index } </script> <style lang="scss"> .tab-bar-container { position: fixed; bottom: 60rpx; width: 80%; left: 10%; z-index: 999; display: flex; flex-direction: row; justify-content: space-around; height: 120rpx; border-radius: 60rpx; box-shadow: 0 4rpx 20rpx rgba(0, 0, 0, 0.1); background: rgba(255, 255, 255, 0.4); } .tab-bar-item { display: flex; flex-direction: column; align-items: center; justify-content: center; padding: 15rpx 40rpx; } .tab-bar-icon { width: 44rpx; height: 44rpx; margin-bottom: 8rpx; } .tab-bar-text { font-size: 24rpx; } </style>其他方法 使用share-element组件实现 复制官方代码,偶先切换页面组件闪动问题。官方uniapp-xapp的demo测试正常,不知道申明原因。 使用components组件+share-element组件实现的tabbar组件实现,tabbar组件会出现与页面移入方向反向滑动的动画 share-element文档 静态资源 tabbar图标(png) 下载地址:https://www.khkj6.com/usr/uploads/2025/08/2337268233.zip 提取码: